
Proper Bra Fit
I have sold a lot of bras, and from time to time, I have had women tell me, “I usually wear such and such a size, but this one doesn’t fit.” Whether your size has changed slightly or dramatically, there may be very simple explanations. Perhaps that “time of the month” has changed your size temporarily. Perhaps a change in diet has sparked a change in your figure. Recognize this, and perhaps you can go “back to normal,” if there is such a thing.
Perhaps you are unfamiliar with a particular manufacturer. As with most clothing, different manufacturers produce different measurement ranges in their clothing lines. I suggest that if you are looking to purchase different manufacturers, then you should try on their items with a department or specialty store before purchasing them online. I would hate for someone to make a purchase, just to be disappointed and just wind up trashing or stuffing the lingerie in the back of the drawer.
You may also experience difficulty with a bra size if you have never been properly measured for a bra. In a lot of cases, women do not take the time to get properly measured by a professional. I will show you how to measure yourself, but you will need an assistant. I hope that by providing information on measuring your bra size, you can properly measure yourself and lower the possibility of buying the wrong size.
Measure for a Proper Bra Fit Guide
Preparing to measure: For best results, get measured wearing an unlined or lightly lined bra.
Step one: Band size

You should cup your breasts and lift them. Your assistant, using a soft tape measure, should measure around the ribcage, directly under the bust, at the thinnest point. A common mistake is that this measurement is taken too low, causing the band size to be too large and not supporting you breasts properly. Be sure the tape is snug, smooth across the back and level with the front. The band is 90% of your support (Just try wearing a well fitted strapless bra)! This is a very important measurement.
Add approximately 1 – 3 inches to this measurement to obtain your band size for smaller band sizes. You will find that this may not be necessary in larger band sizes. For example, if your ribcage measurement is 29″ + (1) = 30″ band size. If the resulting band size is an odd number, such as 33″, you can usually go up to the next even band size (34″), but you should also try on the next lower band size (32″).
Step two: Cup Size
Measure completely around the bust at the fullest point, holding the tape measure straight, but not tight. The difference between this measurement and your BAND size is your cup size. Each inch of difference is equal to one cup size. For example, if your band size is 34″ and your bust measurement is 35″, then you wear an “A” cup.
If the difference is less than an inch, then the cup size is = to AA cup, 1 inch = A cup, 2 inches = B cup 3 inches = C cup 4 inches = D cup 5 inches = DD cup and so one. While this method is generally reliable, this is only a STARTING point. Every woman’s figure is different, as are the varying fits of bras and results may vary. We recommend that your try several sizes and styles to find the best fit for you.
The style of bra you are looking for may also affect the size you purchase. Please keep this in mind. Take a t-shirt with you when you are trying on bras to see if you are getting the best look out of the bra. You may want to take more than one. A black one, a white one and a button down shirt are three recommended shirts to take with you to make sure you look your best in whatever you choose to wear.
A correctly fitting bra should sit firmly but comfortably around the body. The underwires should lie flat against the rib cage, and contain the whole breast (not sitting against ANY breast tissue. Use a mirror to get your side view and make sure the wire is sitting behind the breast tissue and against bone). The breast should be contained within the cup with no puckering or bulging in the cup fabric.
Wearing the wrong size bra can make you very uncomfortable, but did you know it can also affect your posture, your confidence and ruin the look of your outerwear?
Here is my Youtube video to help with the bra fit explanation:
Here are a few things to check, to see if you are wearing the wrong size bra and more importantly what to look out for in a correct fitting bra.
Features of the wrong size:
- Breast being squeezed out of the cup creating a double bust effect.
- Breast not fully contained within the underwire, resulting in wires digging into the breast tissue or breast dropping out under the wire.
- Underband not sitting level at the front and back, riding up at the back.
- Underwires standing away from the from the body
- Shoulder straps digging in.
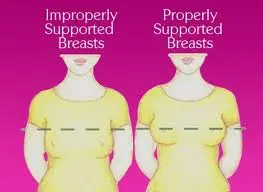
- Unsupported breast drooping forward.
- Center of bra (called the gore) not sitting flat against the breast bone.
- You can pull the back of the bra more than two figure lengths away from the body (indicating the band is too big)
Features of the right size:
- Underband firmly anchored around the body. Level at the front and back.
- Breast fully contained with the underwire. (if not and a bigger cup is too big, try a full-figure bra that has more depth in the cup, rather than size)
- No puckering or overspill in the cup.
- Underwires sit flat against the chest wall.
- Breast well supported giving the best support.
- Comfortable and supportive.
It may feel a little uncomfortable at first while you get used to a bra that actually fits but the health and appearance benefits by far outweigh this;
- Uplifted breasts
- An improved posture
- Minimised back pain
- A waist you never knew you had
The list goes on but if you wear a correct fitting bra, you will exude confidence, as you will look better in your clothes and therefore feel better about yourself. Without the right foundation, you’ll never look your best!
Just one more tip. When you are putting on a bra, put the straps on and bend at the waist. Allow your breasts to naturally fall into the cups and fasten. Then, with the opposite hand, gently bring the breast tissue forward from the back towards your cleavage (running your hand along the inside of the bottom of the cup), while the same side hand holds onto the bra by the band. Do this for both breasts. Then run your figures from the center of the bra along the top of the cup to gently separate the breast tissue and smoothing it back into the cups.
When the breasts are lifted to where they should be, the point farthest from the chest wall (the apex) should be halfway between the shoulder and the elbow.
Do you still have questions, or would like a personal consultation? It’s free and available via skype (nnnlingerie)! Just email me at to set up an appointment. Please try to have a soft measuring tape with you at the time of the appointment. It’ll be like having a personal bra fit specialist right in your own home and you won’t have to clean up before I get there! 😉
Try Our New Bra Size Calculator
Measure your underbust and bust in either inches or centimeters.
For best results, measure while braless or wearing a non-padded bra.